Select Page
Streamline SYSPRO 8 Client Installs with Batch Install Files

Streamline SYSPRO 8 Client Installs with Batch Install Files

Simplifying SYSPRO 8 Client Installations

Installing client machines for SYSPRO ERP can be a tedious process. Accessing the SYSPRO 8 Installer on each client machine, signing in to the installer, going through the various tabs and steps to successfully install both the client and the necessary reporting software. What if there was a significantly easier way to perform these installations? As a matter of fact – there is!

SYSPRO ERP User

Instead of going through the installer every time you install a SYSPRO client, you can create and export a SYSPRO product batch file. The batch file allows you to both quickly and quietly install a SYSPRO client along with the necessary reporting software without using the SYSPRO installer at all.

You can create your own SYSPRO batch file installer by following the steps outlined below.

STEP ONE: Launching the SYSPRO Installer

Find and launch the latest version of the SYSPRO Installer. By default, this file is located in: “\\*servername*\SYSPRODeploy”.

STEP TWO: Signing In

Go through the steps of signing in to the installer using your SYSPRO InfoZone credentials.
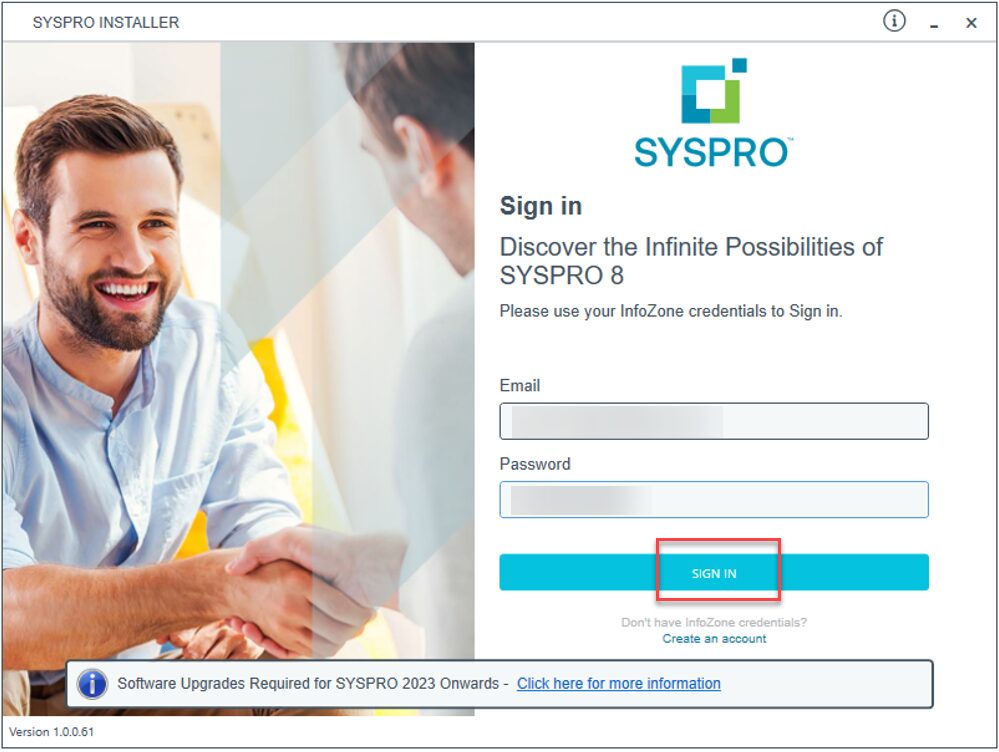
SYSPRO Sign In

STEP THREE: Click to Select

Click on “SYSPRO ERP Software”.
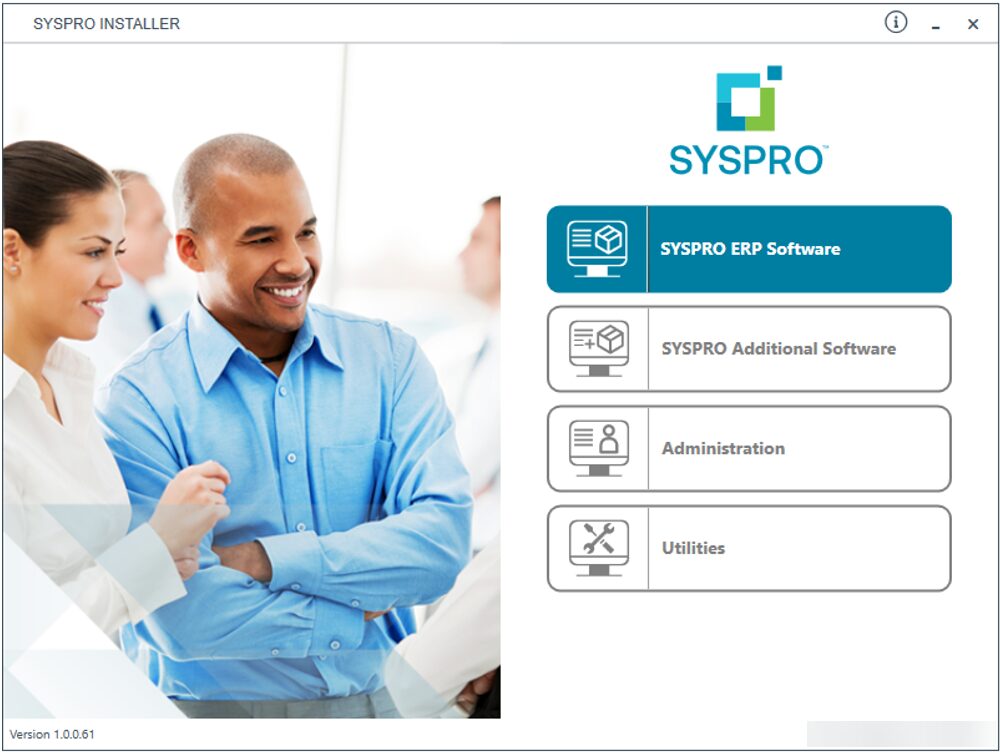
SYSPRO Installer

STEP FOUR: Selecting Deployment Group

Click “Select” on your desired deployment group.
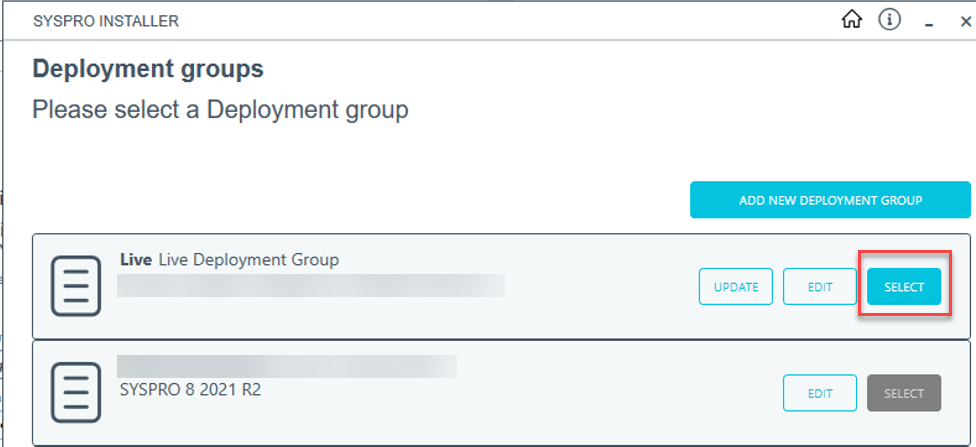
SYSPRO Deployment Groups

STEP FIVE: Exporting SYSPRO 8 Client

You should now see the available product list for your SYSPRO environment. In the top left-corner of the product list header there will be a little “Export” button. Click this button.

SYSPRO Product Selection

STEP SIX: Export

The product list now changes to an “Export” selection. Find and select the SYSPRO 8 Client and click to continue the export. 
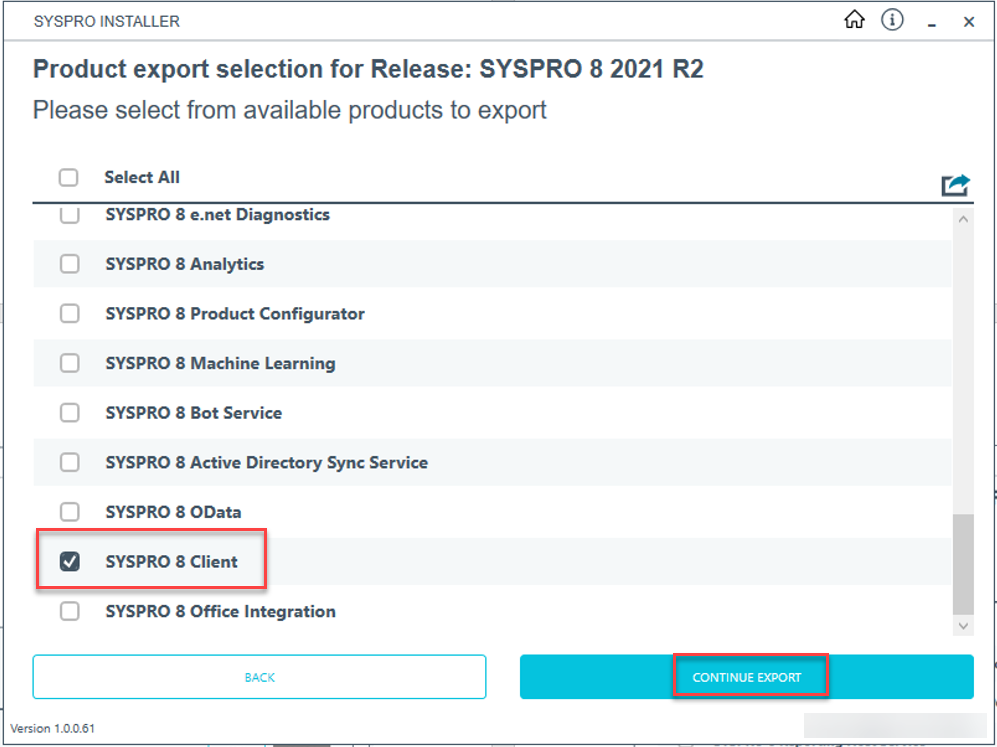
SYSPRO Product Export

STEP SEVEN: SYSPRO Terms

You will be asked to review and agree to general installation terms. Proceed through the export wizard until you can select to begin the export.
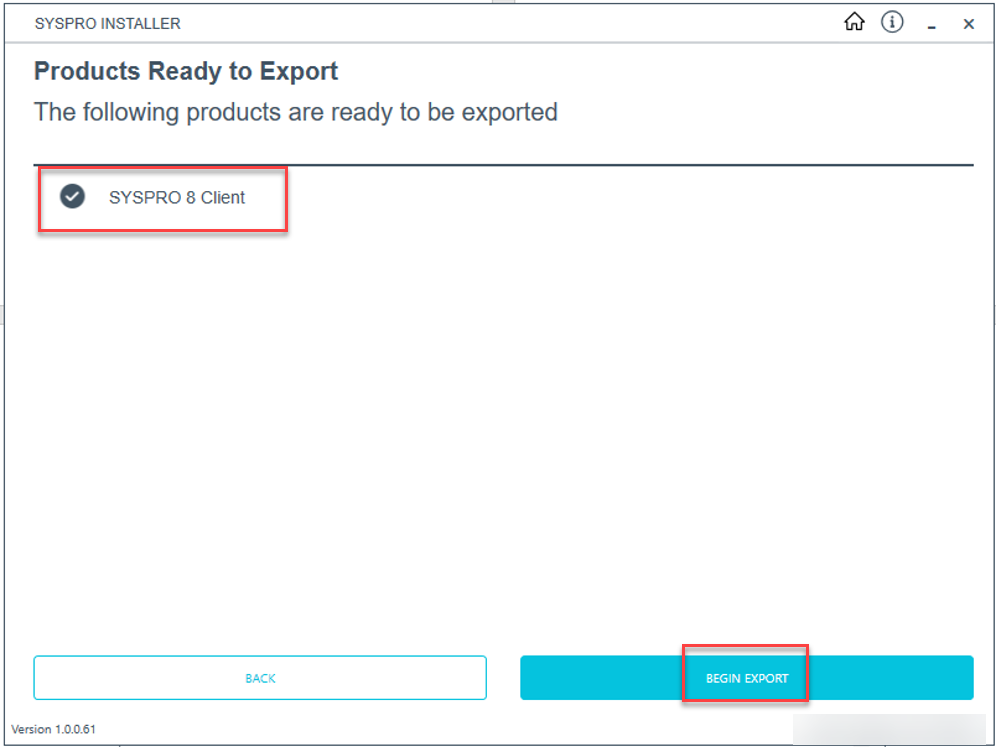
SYSPRO 8 Client

Effortless SYSPRO 8 Client Installation with Batch Files

A batch file is now created and can be used to install the SYSPRO 8 client along with its required services. By default, the batch file is stored in “\\*servername*\SYSPRODeploy\Exports”. Following similar steps, you can create an additional batch file for reporting software by navigating through the “Additional Software” section of the installer and selecting your version of Crystal Reports to export. Using these batch files, you can now quietly install a full SYSPRO client configuration with only a few clicks!

Here are a few helpful tips to keep in mind when using the batch files:

  • Run the batch file to install the SYSPRO client first prior to installing any reporting software. 
  • To ensure that the products are installed properly, make sure that you run the batch files as administrator. Additionally, the domain user running the batch files will need sufficient access to the SYSPRODeploy folder on the SYSPRO Server where the targeted products and install files are located. 
  • You can use the Programs & Features part of Windows to verify that the products installed successfully after running the batch files. 
  • If something fails to install, you can always use the SYSPRO 8 Installer program to retry the installation manually.

Troubleshooting SYSPRO: General SYSPRO 8 Instabilities

Troubleshooting SYSPRO: General SYSPRO 8 Instabilities

Is Troubleshooting SYSPRO Troubling You?

General issues are to be expected when utilizing a client-server-based piece of ERP software the size of SYSPRO. Client machines not responding, crashing, or getting disconnected is not unusual. From an administrative perspective, it is important to know the various factors that can affect these general system stability issues. In this article, we have outlined some of the factors that can cause these problems as well as some tools to know, utilize, and review when diagnosing general SYSPRO instability. 

Troubleshooting SYSPRO Warehouse Worker

Antivirus and Firewall Exceptions

One of the general offenders causing SYSPRO issues are antivirus software. SYSPRO opens the required ports in the Windows Firewall when it is installed, however, most sites utilize additional antivirus and/or firewall software that will have to be configured separately. SYSPRO 8 uses port 30250 and 3702 by default but be sure to verify the ports used in your own environment. 

If you see installation errors relating to SYSPRO clients or client-side reporting tools, you can try disabling local antivirus during the installation. Make sure to turn it back on after the installation has been completed. 

SQL Health Dashboard

The SQL Health Dashboard (IMPDBS) is a built-in SYSPRO tool that analyzes your SQL Server and reports back with any potential issues. When you open the program, it will scan your SYSPRO databases one by one and provide you with an overview of potential issues. Any issues reported here will likely relate to system-wide issues more so than issues pertaining to specific client machines. Seeing this program report “green” across the board is vital for ensuring that your SQL Server is running at its best. 

System-Audit Query

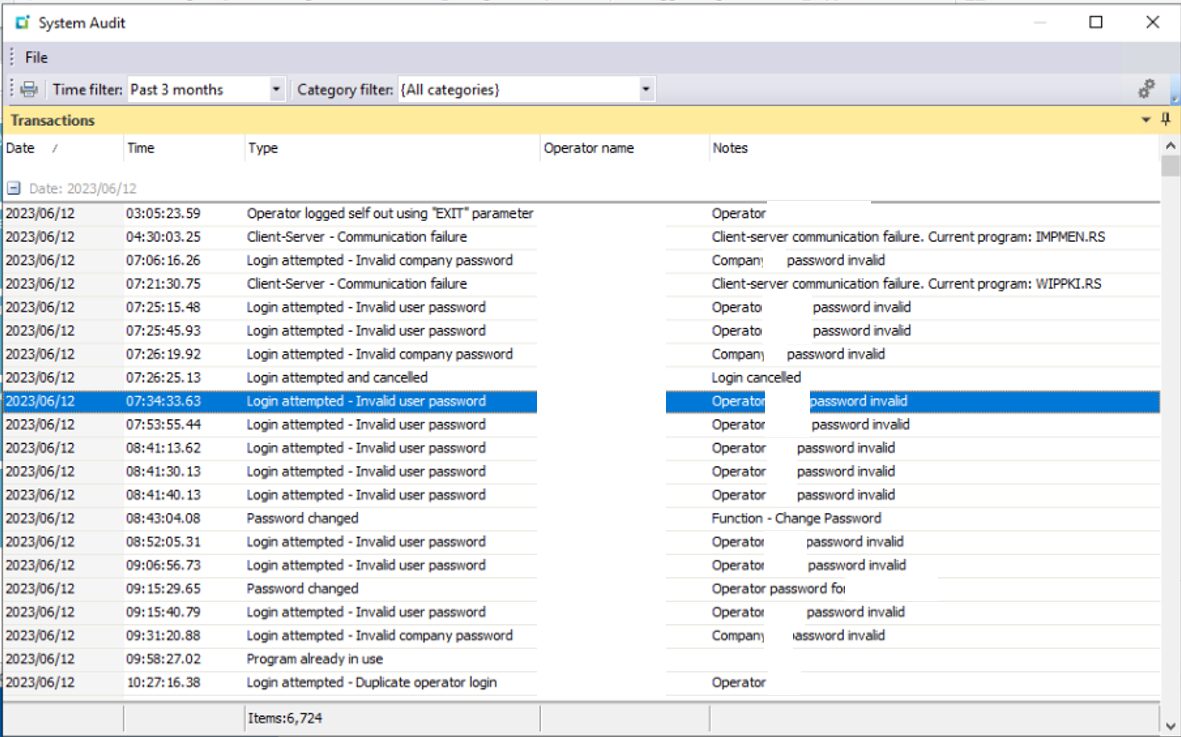
System-Audit Query (IMPJNS) is another built-in tool that you can use to diagnose problems in SYSPRO. This one is particularly helpful to determine if disconnects or errors are unique to a specific operator and/or program. You can use the program to filter for client-server disconnects and determine who is encountering them, when they are encountering them, and where they are encountering them. This program can’t fix the problem, but it can tell you if one exists!

Troubleshooting SYSPRO ERP

SYSPRO Troubleshooting: SYSPRO System Audit

Client Folder Permissions

By default, the client-side installation of SYSPRO is found at “C:\SYSPROClient”. This folder contains the local SYSPRO install, user settings, and program files. Depending on default settings for a domain user, it is possible that there is insufficient access to this folder. If a local client machine is having unusual errors or access problems, try providing full control for authenticated users to this folder. You can do so by right-clicking the “SYSPROClient” folders and going to “Properties”. 

Check Resource Utilization

SYSPRO utilizes significant system resources during certain business functions and report generation. To ensure that SYSPRO has sufficient resources to perform its tasks, be sure to review local client machine hardware and memory availability on the SYSPRO server itself. If the server is suffering from limited resources, it can result in a system-wide slowdown for all client-machines connected to SYSPRO.

Troubleshooting SYSPRO with EstesGroup Experts

Troubleshooting general SYSPRO 8 instabilities can be a complex and time-consuming process. From managing antivirus and firewall exceptions to monitoring SQL health and system resource utilization, there are numerous factors to consider when diagnosing and resolving these issues.

However, by leveraging the power of private cloud hosting through EstesGroup, you can simplify your SYSPRO deployment and minimize the risk of encountering these instabilities altogether. With our expertise in managing SYSPRO environments and our state-of-the-art private cloud infrastructure, you can focus on running your business while we handle the technical complexities.

Change Management Tips for Your Epicor Kinetic Upgrade

Change Management Tips for Your Epicor Kinetic Upgrade

The Process

Is your team ready to unlock the full potential of Epicor Kinetic? Don’t fear the upgrade process – with these key strategies, you’ll guide your team through a smooth and successful transition. You can quickly elevate operations with Epicor Kinetic. But before you embark on this exciting journey, let’s address a common concern: Change Management.

Change Management Epicor Kinetic Upgrade ERP

What is change management in an Epicor Kinetic upgrade?

Change management for Epicor Kinetic is your strategic roadmap for a smooth transition from an older Epicor system to the new Kinetic platform. It involves proactively preparing, guiding, and supporting your entire organization throughout the process. The ultimate goal is to minimize disruption, ensure your employees embrace the new system, and maximize the benefits it has to offer.

How to Manage Your Change Management: Epicor Kinetic Upgrade Management

Successfully upgrading to Epicor Kinetic requires a collaborative effort. By implementing these key strategies, you can equip your team with the knowledge, ownership, and resources they need to thrive in the new system:

  • Keep employees informed about the upcoming changes, the reasons behind them, and the expected timeline is crucial.
  • Provide employees with the necessary training on the new features and functionalities of Kinetic ensures they can effectively utilize the system and its benefits. Actively involving key stakeholders and employees in the process can foster a sense of ownership and encourage participation.
  • Use your top talent at all levels to create a detailed plan that outlines the steps required to migrate data, update workflows, and adapt to the new system.

The Culture

Navigating an Epicor Kinetic upgrade requires a strategic approach. Discover how to minimize disruption, ensure user adoption, and maximize the benefits of your new system with effective change management strategies. Learn how to anticipate and address concerns, foster communication, and build a successful transition plan for your team:

  • Acknowledge and Address Concerns: Understand change can be daunting. Openly discuss potential challenges and proactively develop solutions to keep your team engaged and motivated.
  • Foster Communication and Transparency: Keep your team informed throughout the process. Share updates, address concerns, and encourage open communication to ensure everyone feels involved and heard.
  • Empower Your Team with Training: Equip your team with the knowledge and skills to navigate the new system effectively. Prioritize comprehensive training tailored to their specific roles and responsibilities.
  • Leverage Collaboration and Teamwork: Encourage knowledge sharing and collaboration between team members. Create a supportive environment where everyone can learn from each other and adapt together.
  • Celebrate Successes and Milestones: Recognize and acknowledge individual and team achievements throughout the transition process. Celebrate milestones to maintain positive momentum and reinforce the value of embracing change.

Prepare for your Epicor Kinetic upgrade with confidence.

Move quickly from your first decision to your building a team that can make the best decisions at every step:

  • Decide what you truly need from your ERP system. Collaborate to identify essential features and streamline your system.
  • Customize with purpose. Assess your current customizations, pinpoint those crucial to your workflow, and remove outdated ones.
  • Discover the power of Kinetic. Break down the new features and how they’ll benefit your specific operations.
  • Build a rock-solid upgrade plan. Develop a detailed strategy and assemble a dedicated upgrade team for a smooth transition.

Knowledge is power, especially when it comes to navigating complex upgrades.

A proactive approach fosters transparency and ownership within your team, paving the way for a smooth and successful transition to the new Kinetic system. By empowering your team with knowledge, you’ll be well-positioned to unlock the full potential of Kinetic and achieve your business goals. Here are a few tips:

  • Equip your team for success: Leverage EstesGroup’s expertise to provide your team with comprehensive documentation and resources.
  • Empower them as upgrade champions: Foster confidence by equipping your team with the knowledge to navigate each step of the process.
  • Gain clarity through collaboration: During an initial consultation, EstesGroup will guide your team through the entire journey, ensuring they feel fully prepared and informed.
  • Transparency and ownership pave the way: This proactive approach fosters transparency and empowers your team to take ownership, setting the stage for a smooth transition to Kinetic.

Anticipate to Migrate

During your Epicor Kinetic upgrade process, anticipate and address potential challenges and concerns your team might have. Understand that fear of change, unfamiliarity with the new system, and perceived disruptions to workflows are common sources of resistance. Partner with EstesGroup to ease the pain and get peace of mind knowing that your project will be successful, your ROI will be bountiful, and your team will be grateful for change.

How to Use Advanced Diagnostics in SYSPRO

How to Use Advanced Diagnostics in SYSPRO

Advanced SYSPRO Debugging Tools – The “Diagnostics” Setup Option

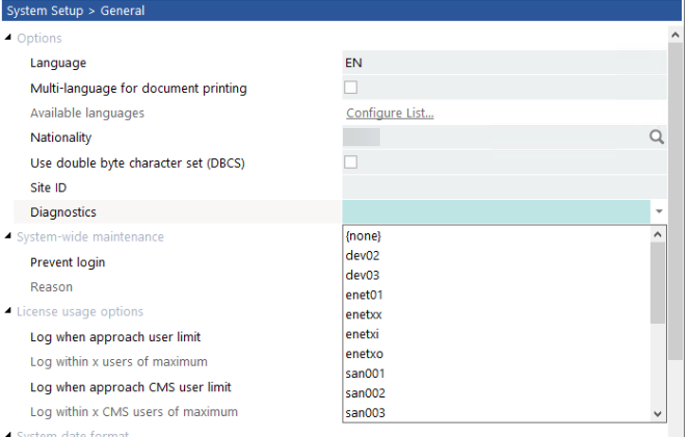
Outside of general SYSPRO database tables in SQL and eSignatures that are not enabled by default, it can be particularly difficult to investigate custom e.net transactions and SQL issues in SYSPRO. Thankfully, an advanced “Diagnostics” tool is available. Contrary to similar administrative tools such as the System Audit Query and Job Logging programs, this tool is not a standalone program. Instead, it is a settings-related options found inside your SYSPRO’s Setup Options program. 

The setting in question is called “Diagnostics” and can be found within SYSPRO’s Setup Options program at: System Setup General Options Diagnostics. The field is a dropdown containing a variety of input options with not-so-descriptive naming conventions such as “dev02”, “enet01”, “enetxi”, and “srsd04”. While all the items available in the diagnostics list serve an important purpose, we will focus this article on the e.net-type diagnostics that can be used to help diagnose and potentially resolve complicated transaction issues. 

SYSPRO Diagnostics

SYSPRO E.net Options

When customizing SYSPRO particularly with third party programs or VBScripts, you are likely to encounter programmatic use of SYSPRO’s business objects. In extremely rare cases, you may experience issues running these business objects. Perhaps you don’t get an XML response, or you are encountering critical system errors with limited details about the errors. In this case, the “enet” diagnostic options can be useful. The “enet01” option creates a log of all business objects that have processed in the system since the diagnostic option was turned on. It saves important information such as transaction date/time, method names (logon, logoff, get, post), and status messages of each transaction. Consider the “enet01” option the “summary” of e.net type diagnostics.

If you require more detail about your e.net transactions, you can use the “enetxx” option. This diagnostics option saves the XML-In and XML-Out details of each business object transaction. The XML-In is the data that was passed to the business object. The XML-Out is the response provided back by the object. The “enetxi” option can be used to only monitor XML-In and the “enetxo” only monitors XML-Out.

While there are several other diagnostic types to choose from, it is unlikely that the information returned by these options will be of any help to you. The remaining diagnostic types are more commonly used by internal SYSPRO staff for testing and debugging of significant errors or new programs in SYSPRO. You can open SYSPRO’s “Help” documentation by pressing “F1” to learn more about the other diagnostics options if it should be of interest. 

System Impact and Log File Growth

It is important to know that some of these diagnostics options can result in very large log files if they are not turned off after an issue has been investigated. Particularly the “enetxx” option as the XML-In and XML-Out for every business object transaction can be significantly lengthy. If you are trying to monitor automated tasks and will have to leave these diagnostics on for extended periods of time, be sure to keep an eye on the log file sizes.

Additionally, many of these diagnostic types can slow down the overall system performance. Every post and query in SYSPRO use some type of business object. These transactions will see a slight performance hit due to SYSPRO recording and logging the data input/output. When you have completed investigating an issue, be sure to clear the log files and turn off the diagnostics options that you had enabled. 

The EstesWay to Advanced Diagnostics in SYSPRO

In conclusion, navigating through complex SYSPRO issues, especially those involving custom e.net transactions and SQL intricacies, can be daunting without the right tools and expertise. Fortunately, the “Diagnostics” setup option within SYSPRO’s Setup Options program provides a valuable resource for investigating and resolving such challenges. By utilizing specific diagnostic settings like “enet01” and “enetxx,” users can gain insights into business object transactions and detailed XML data, aiding in the troubleshooting process. However, it’s crucial to exercise caution with these diagnostic options, as they can lead to substantial log file growth and potential system performance impacts if left unchecked. Nevertheless, with the support and guidance of EstesGroup consultants, businesses can effectively leverage these advanced debugging tools to overcome SYSPRO-related hurdles and optimize their operations.

Empower your users with advanced diagnostics in SYSPRO ERP today.

SYSPRO Advanced Diagnostics Tool

Follow these steps to get immediate assistance with SYSPRO ERP:

  • Contact EstesGroup consultants via chat, website, or phone.
  • Describe your SYSPRO issue and request advanced diagnostic assistance.
  • Schedule a consultation with EstesGroup SYSPRO ERP specialists.
  • Collaborate with consultants to enable and utilize diagnostic tools.
  • Implement recommendations provided by EstesGroup for issue resolution.

EstesGroup Interviews Dan Aldridge: A Journey Through ERP

EstesGroup Interviews Dan Aldridge: A Journey Through ERP

Celebrating 20 Years with EstesGroup

For two decades, EstesGroup has been immersed in the world of Enterprise Resource Planning (ERP), aiding companies in harnessing technology for their organizational advancement. In honor of EstesGroup’s 20th anniversary, we embark on a series of interviews with friends and colleagues who have shared in our remarkable journey.

Dan Aldridge Interview ESTES LIVE 2024

On January 12th, Brad Feakes, President of EstesGroup, sat down with Dan Aldridge, a prominent figure in the ERP community and a burgeoning social media influencer in the realms of digital transformation, change management, and Enterprise Resource Planning.

Begin with Baan

Dan brings a unique perspective to the ERP landscape, having actively participated in ERP since the late ’90s and directly witnessing the Y2K ERP boom and its aftermath. Having gained experience with Baan’s Tier 1 ERP solution at its peak, he observed its subsequent decline and eventual integration into Infor’s comprehensive suite of ERP solutions. One could say he has witnessed it all.

Network Equals Net Worth

Dan’s career is characterized by the relationships cultivated along the journey. Colleagues from past ventures became the foundation for new endeavors. When it was time to expand the team and venture into new territories, his network provided invaluable support. Reflecting on the past, Dan finds new connections emerging based on shared business cultures that transcend their original brands.

Inbound and Outbound Strategies

In marketing and business development, Dan emphasizes the transformative power of relationships. Rather than conforming to algorithmic preferences, he advocates for informative and educational content that fosters genuine connections. “Network equals net worth” underscores the organic growth nurtured by meaningful relationships. Dan’s approach to content marketing aligns with his organizational goals while building his personal brand. In the ERP space, inbound marketing is inherently relational, focusing on solving problems and building connections that drive business growth.

Scaling, Impaling, and Prevailing

Dan’s insights into business growth and operations extend from his experiences as a business owner and a leader tasked with growing an ERP organization in the US market. Scaling organizations presents unique challenges that extend beyond implementation activities. Navigating growth requires tailored approaches in sales and marketing, particularly when transitioning from a smaller market to a larger one.

Solutions vs. Services

A notable challenge in the ERP space lies in the disparity between selling ERP solutions and selling implementation services. Selling ERP solutions emphasizes software capabilities, while selling implementation services focuses on demonstrating domain authority and expertise. As a consultant, selling services is often more straightforward due to the control over delivery, unlike the uncertainties associated with software sales.

Navigating the Future: Cloud ERP and Composable ERP

Cloud ERP dominates the horizon as on-premise models become obsolete. Dan explores the concept of Composable ERP, envisioning dynamic ERP architectures built atop legacy infrastructure without necessitating underlying system upgrades. This approach offers large organizations the flexibility to create common business processes across divisions with disparate systems, heralding a new era in ERP adaptability.

Next Steps: More EstesGroup Interviews to Come!

As the year unfolds, EstesGroup will continue celebrating its 20th anniversary by reflecting on the journey alongside the friends and colleagues who have been part of this remarkable story. We look forward to sharing more EstesGroup interviews with you along the way.

Follow Us

Watch EstesGroup Interviews on YouTube to Learn More about ERP in 2024

Unlocking Automation with SYSPRO® Business Objects

Unlocking Automation with SYSPRO® Business Objects

SYSPRO® Business Objects – The Basics

If you are looking to automate or customize data processing in SYSPRO® then business objects will be your best friend. A business object in SYSPRO® is a program that does not have any user interface. Instead, they rely on defined schemas to take in data, transact with SYSPRO®, and return status messages. Both the input and output are based on XML.

SYSPRO Business Objects Unlocking Automation

The latest versions of SYSPRO® ship with a significant list of available business objects to use. Each object serves its own purpose and can be used for specific types of transactions. They follow a similar naming convention to SYSPRO’s usual user-interface programs in the way that they all have codes. For instance, you can use SORTOI to create sales orders, APSTIN to post invoices, and INVSST to add, delete, modify stock codes.

Business objects exist to allow for safe, reliable automation of data transactions. While you may be familiar with the SYSPRO® SQL database, you should never use direct SQL to modify SYSPRO data. Business objects allow you simply choose your object based on the type of transaction you seek to perform, fill in the schema details, and let SYSPRO® perform the heavy lifting in the database to post the transaction. 

SYSPRO® 
Business Object Groups

All business objects in SYSPRO® are categorized into one of four types of objects:

  • Query – Objects intended to retrieve and query data (“Get” functions).
  • Setup – Objects used to create or modify data such as suppliers, stock codes, or customers. This type requires additional parameters to specify whether you intend to add, modify, or delete.
  • 
Transaction – Used to post transactional data to SYSPRO®. Examples such as creating sales orders, posting invoices, or receiving inventory.
  • Build – Objects that can be used to retrieve information to better build transaction-type posts.

Business Object Schemas and Sample XML Data

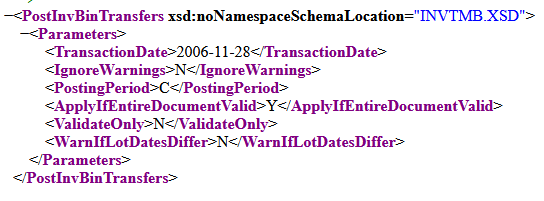
Business objects have a pre-defined “schema” containing the various fields and parameters that can be used in the object. Transaction and Setup type objects have an XML parameter file in addition to the XML-In data. As an example, below is the default sample schema XML for the INVTMB business object. This object is a Transaction-type object used to post bin transfer inventory movements.

INVTMB Parameter XML

SYSPRO Business Object

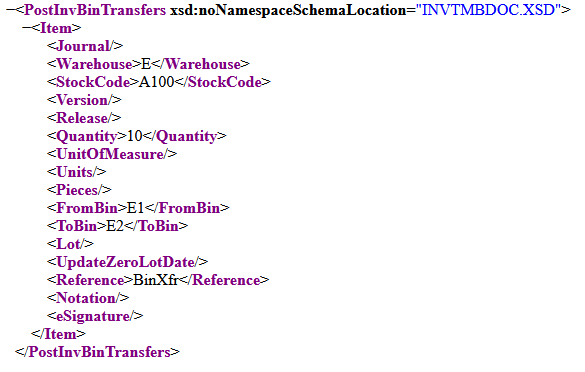
INVTMB Input XML

SYSPRO INVTMB Input XML

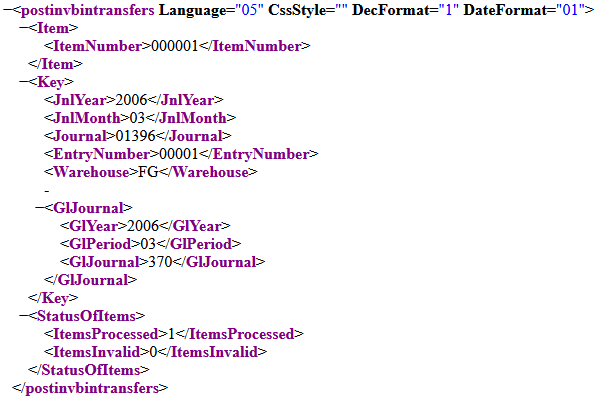
INVTMB XML Output (Sample)

SYSPRO Settings Automation

The parameter file contains “Settings” to apply for the overall transaction. While these settings vary based on the business object, common parameter tags are TransactionDate, ValidateOnly (testing only versus committing to the post), ApplyIfEntireDocumentValid (Post only if all items are valid).  Note that Query-type objects do not use parameter files and will not need parameter XML passed for them to work. 

The input XML (XML-In) is the item-specific data to supply the object. For this object, this is where we provide the stock code to transfer, source/destination bin, and the number of units to transfer. For many objects, it is possible to supply several “<item>” entries at a time to bulk-post transactions.

Each business object provides a “response” in the shape of an XML-Output file. In the case of the INVTMB object seen above, the output contains journal and key details about the successful inventory transfer. Most objects will have a summary of the transaction stating how many items succeeded and how many failed (if any). The XML-Out for Query-type objects will be the search results based on what you requested.

Licensing

All business objects are freely available for use if they are called and transacted within SYSPRO®. This means any script or program developed within SYSPRO® itself. If you intend to use a business object outside of SYSPRO®, you will have to purchase and update your licenses. Business objects are bundled together and grouped by modules so that you only pay for business objects that you need. For instance, if you intend to automate sales order-related data, you can license sales order business objects specifically.

The best place to learn and use business objects is the e.net Diagnostics tool. This is a program you can install using the Installer on either the server itself or on the client machine.  

Elevate your business to new heights with EstesGroup’s unparalleled managed IT and cloud services for SYSPRO® ERP.

Experience a transformative approach to technology management, ensuring optimal performance, security, and scalability for your operations. Our expert team at EstesGroup is dedicated to delivering tailored solutions, seamlessly integrating managed IT services and cutting-edge cloud technology. From proactive maintenance to advanced cybersecurity measures, we provide a comprehensive suite of services that empower your business to thrive in the digital era. Trust EstesGroup to be your strategic partner, guiding you towards efficiency, innovation, and sustained growth through our top-notch managed IT and cloud services.