Select Page
Change Management Tips for Your Epicor Kinetic Upgrade

Change Management Tips for Your Epicor Kinetic Upgrade

The Process

Is your team ready to unlock the full potential of Epicor Kinetic? Don’t fear the upgrade process – with these key strategies, you’ll guide your team through a smooth and successful transition. You can quickly elevate operations with Epicor Kinetic. But before you embark on this exciting journey, let’s address a common concern: Change Management.

Change Management Epicor Kinetic Upgrade ERP

What is change management in an Epicor Kinetic upgrade?

Change management for Epicor Kinetic is your strategic roadmap for a smooth transition from an older Epicor system to the new Kinetic platform. It involves proactively preparing, guiding, and supporting your entire organization throughout the process. The ultimate goal is to minimize disruption, ensure your employees embrace the new system, and maximize the benefits it has to offer.

How to Manage Your Change Management: Epicor Kinetic Upgrade Management

Successfully upgrading to Epicor Kinetic requires a collaborative effort. By implementing these key strategies, you can equip your team with the knowledge, ownership, and resources they need to thrive in the new system:

  • Keep employees informed about the upcoming changes, the reasons behind them, and the expected timeline is crucial.
  • Provide employees with the necessary training on the new features and functionalities of Kinetic ensures they can effectively utilize the system and its benefits. Actively involving key stakeholders and employees in the process can foster a sense of ownership and encourage participation.
  • Use your top talent at all levels to create a detailed plan that outlines the steps required to migrate data, update workflows, and adapt to the new system.

The Culture

Navigating an Epicor Kinetic upgrade requires a strategic approach. Discover how to minimize disruption, ensure user adoption, and maximize the benefits of your new system with effective change management strategies. Learn how to anticipate and address concerns, foster communication, and build a successful transition plan for your team:

  • Acknowledge and Address Concerns: Understand change can be daunting. Openly discuss potential challenges and proactively develop solutions to keep your team engaged and motivated.
  • Foster Communication and Transparency: Keep your team informed throughout the process. Share updates, address concerns, and encourage open communication to ensure everyone feels involved and heard.
  • Empower Your Team with Training: Equip your team with the knowledge and skills to navigate the new system effectively. Prioritize comprehensive training tailored to their specific roles and responsibilities.
  • Leverage Collaboration and Teamwork: Encourage knowledge sharing and collaboration between team members. Create a supportive environment where everyone can learn from each other and adapt together.
  • Celebrate Successes and Milestones: Recognize and acknowledge individual and team achievements throughout the transition process. Celebrate milestones to maintain positive momentum and reinforce the value of embracing change.

Prepare for your Epicor Kinetic upgrade with confidence.

Move quickly from your first decision to your building a team that can make the best decisions at every step:

  • Decide what you truly need from your ERP system. Collaborate to identify essential features and streamline your system.
  • Customize with purpose. Assess your current customizations, pinpoint those crucial to your workflow, and remove outdated ones.
  • Discover the power of Kinetic. Break down the new features and how they’ll benefit your specific operations.
  • Build a rock-solid upgrade plan. Develop a detailed strategy and assemble a dedicated upgrade team for a smooth transition.

Knowledge is power, especially when it comes to navigating complex upgrades.

A proactive approach fosters transparency and ownership within your team, paving the way for a smooth and successful transition to the new Kinetic system. By empowering your team with knowledge, you’ll be well-positioned to unlock the full potential of Kinetic and achieve your business goals. Here are a few tips:

  • Equip your team for success: Leverage EstesGroup’s expertise to provide your team with comprehensive documentation and resources.
  • Empower them as upgrade champions: Foster confidence by equipping your team with the knowledge to navigate each step of the process.
  • Gain clarity through collaboration: During an initial consultation, EstesGroup will guide your team through the entire journey, ensuring they feel fully prepared and informed.
  • Transparency and ownership pave the way: This proactive approach fosters transparency and empowers your team to take ownership, setting the stage for a smooth transition to Kinetic.

Anticipate to Migrate

During your Epicor Kinetic upgrade process, anticipate and address potential challenges and concerns your team might have. Understand that fear of change, unfamiliarity with the new system, and perceived disruptions to workflows are common sources of resistance. Partner with EstesGroup to ease the pain and get peace of mind knowing that your project will be successful, your ROI will be bountiful, and your team will be grateful for change.

How to Use Advanced Diagnostics in SYSPRO

How to Use Advanced Diagnostics in SYSPRO

Advanced SYSPRO Debugging Tools – The “Diagnostics” Setup Option

Outside of general SYSPRO database tables in SQL and eSignatures that are not enabled by default, it can be particularly difficult to investigate custom e.net transactions and SQL issues in SYSPRO. Thankfully, an advanced “Diagnostics” tool is available. Contrary to similar administrative tools such as the System Audit Query and Job Logging programs, this tool is not a standalone program. Instead, it is a settings-related options found inside your SYSPRO’s Setup Options program. 

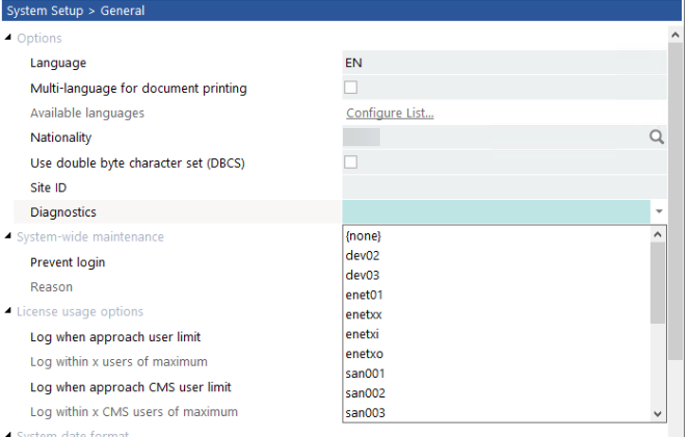
The setting in question is called “Diagnostics” and can be found within SYSPRO’s Setup Options program at: System Setup General Options Diagnostics. The field is a dropdown containing a variety of input options with not-so-descriptive naming conventions such as “dev02”, “enet01”, “enetxi”, and “srsd04”. While all the items available in the diagnostics list serve an important purpose, we will focus this article on the e.net-type diagnostics that can be used to help diagnose and potentially resolve complicated transaction issues. 

SYSPRO Diagnostics

SYSPRO E.net Options

When customizing SYSPRO particularly with third party programs or VBScripts, you are likely to encounter programmatic use of SYSPRO’s business objects. In extremely rare cases, you may experience issues running these business objects. Perhaps you don’t get an XML response, or you are encountering critical system errors with limited details about the errors. In this case, the “enet” diagnostic options can be useful. The “enet01” option creates a log of all business objects that have processed in the system since the diagnostic option was turned on. It saves important information such as transaction date/time, method names (logon, logoff, get, post), and status messages of each transaction. Consider the “enet01” option the “summary” of e.net type diagnostics.

If you require more detail about your e.net transactions, you can use the “enetxx” option. This diagnostics option saves the XML-In and XML-Out details of each business object transaction. The XML-In is the data that was passed to the business object. The XML-Out is the response provided back by the object. The “enetxi” option can be used to only monitor XML-In and the “enetxo” only monitors XML-Out.

While there are several other diagnostic types to choose from, it is unlikely that the information returned by these options will be of any help to you. The remaining diagnostic types are more commonly used by internal SYSPRO staff for testing and debugging of significant errors or new programs in SYSPRO. You can open SYSPRO’s “Help” documentation by pressing “F1” to learn more about the other diagnostics options if it should be of interest. 

System Impact and Log File Growth

It is important to know that some of these diagnostics options can result in very large log files if they are not turned off after an issue has been investigated. Particularly the “enetxx” option as the XML-In and XML-Out for every business object transaction can be significantly lengthy. If you are trying to monitor automated tasks and will have to leave these diagnostics on for extended periods of time, be sure to keep an eye on the log file sizes.

Additionally, many of these diagnostic types can slow down the overall system performance. Every post and query in SYSPRO use some type of business object. These transactions will see a slight performance hit due to SYSPRO recording and logging the data input/output. When you have completed investigating an issue, be sure to clear the log files and turn off the diagnostics options that you had enabled. 

The EstesWay to Advanced Diagnostics in SYSPRO

In conclusion, navigating through complex SYSPRO issues, especially those involving custom e.net transactions and SQL intricacies, can be daunting without the right tools and expertise. Fortunately, the “Diagnostics” setup option within SYSPRO’s Setup Options program provides a valuable resource for investigating and resolving such challenges. By utilizing specific diagnostic settings like “enet01” and “enetxx,” users can gain insights into business object transactions and detailed XML data, aiding in the troubleshooting process. However, it’s crucial to exercise caution with these diagnostic options, as they can lead to substantial log file growth and potential system performance impacts if left unchecked. Nevertheless, with the support and guidance of EstesGroup consultants, businesses can effectively leverage these advanced debugging tools to overcome SYSPRO-related hurdles and optimize their operations.

Empower your users with advanced diagnostics in SYSPRO ERP today.

SYSPRO Advanced Diagnostics Tool

Follow these steps to get immediate assistance with SYSPRO ERP:

  • Contact EstesGroup consultants via chat, website, or phone.
  • Describe your SYSPRO issue and request advanced diagnostic assistance.
  • Schedule a consultation with EstesGroup SYSPRO ERP specialists.
  • Collaborate with consultants to enable and utilize diagnostic tools.
  • Implement recommendations provided by EstesGroup for issue resolution.