Select Page
The Ancient Art of Specifying Report Requirements in Epicor

The Ancient Art of Specifying Report Requirements in Epicor

Designing Custom Reports in Epicor ERP

Creating custom reports in any Enterprise Resource Planning (ERP) system, including Epicor Kinetic, can be a surprisingly difficult endeavor. I’ve seen numerous cases in custom report development where the final deliverables did not match the expectations. Why does this happen? Most often, it’s not due to technical challenges but rather the difficulty in defining what you actually need.

Report Requirements in Epicor

If you are considering creating a custom report and are in the process of specifying report requirements in Epicor, there are a few things to keep in mind.

When requesting a custom report in Epicor ERP, simply providing a paper copy of a report from your legacy system and asking the developer to recreate it in Epicor is not enough to ensure a successful outcome. While the legacy report may serve as a starting point, it’s essential to recognize that the data structure and available fields in Epicor may differ from your previous system. To create an effective custom report, you need to provide more specific details about your requirements, taking into account the unique features and capabilities of Epicor ERP. Similarly, offering a one-line description of your desired report and expecting the developer to “get it done” is insufficient for achieving the desired results. A brief, vague description leaves too much room for interpretation and can lead to misunderstandings. So, make note of these two things not to do when planning your approach:

  1. Simply pulling out a paper copy of a report from the legacy system and saying, “Do it in Epicor,” is not sufficient.
  2. Providing a one-line description and saying, “Get it done,” is also inadequate.
Investing time in creating detailed specifications can save you from multiple rounds of revisions and ensure a more efficient and successful custom report development process in Epicor ERP.
In other words, if you want a good report, you need to specify the details.

Key Elements for Specifying an Epicor Report

To ensure your custom report meets your expectations, consider the following key elements:

Query Logic

What should the underlying query return? For example, specifying the report logic might involve “all active parts of Part Class X” or “all sales order miscellaneous charges that have not yet been invoiced.” Providing this basic logic helps the developer structure the underlying query.

Filters

Do you need to run the report filtered by something, such as the part, supplier, or site? If so, note it, as this will affect how the report is created.

Groupings

How do you want the data in the report grouped? For instance, you may want the data grouped “by site and customer.”

Sorts

Within the groupings, how should the data be sorted? This will impact how the underlying query is structured before the data is passed to the report designer. For example, you might want to “group by site and customer, and sort by invoice number” or “sort alphabetically by part number.”

Fields and Field Order

It’s important to know the specific ERP fields where the data lies, and the order they should appear in the report. If it’s a calculated field, you need to provide the calculation (e.g., past due = due date – current date).

Sample Data

Often, to build a report, you will need the underlying data in the development environment. For example, if you are specifying a report that collects all miscellaneous charges, you may need to create some sales orders and sales order lines with miscellaneous charges.

Mockup

Providing a visual mockup of what you are looking for helps the developer organize the output. If you are replacing an existing report from a legacy system, this may be a good time to use the legacy report copy, albeit with the necessary edits to make it specific to the new ERP system.

By considering these key elements and providing clear specifications, you can help ensure that your custom report meets your expectations and delivers the insights you need.

When defining report requirements in Epicor ERP, it’s crucial to provide clear and detailed specifications to ensure the final output meets your expectations.

Epicor report requirements should include query logic, filters, groupings, sorts, fields, sample data, and a visual mockup to guide the developer in creating a custom report that aligns with your business needs. By effectively communicating your Epicor report requirements, you can streamline the development process and obtain the insights you need to make informed decisions and drive your business forward. Creating custom reports in Epicor ERP can be a complex process, but by understanding and addressing the key challenges, you can ensure your reports meet your specific needs. The most significant hurdle is often not the technical aspects but rather the difficulty in clearly defining your requirements. By providing detailed specifications, you can help bridge the gap between your expectations and the final deliverable. Remember, effective communication and collaboration are essential to overcoming challenges.

Embrace Cloud, Save the Planet with Sustainable ERP Migration

Embrace Cloud, Save the Planet with Sustainable ERP Migration

Optimize Enterprise Resource Planning and Contribute to a Greener Future

As manufacturers and distributors face increasing pressure to optimize operations, reduce costs, and minimize their environmental impact, many are considering the move from on-premise Enterprise Resource Planning (ERP) solutions to cloud-hosted alternatives. This transition to cloud ERP offers numerous benefits, including improved scalability, accessibility, cost-efficiency, and reduced carbon footprint. In this blog post, we’ll explore three key categories of helpful tips to guide manufacturers and distributors through this transformative journey while incorporating sustainable environmental tactics.

Sustainable ERP Migration

ERP Migration to Cloud: Planning and Preparation

STEP ONE: Assess your current ERP system. Evaluate your existing on-premise ERP solution to identify its strengths, weaknesses, and pain points. This assessment will help you determine which features and functionalities are essential in your new cloud-hosted ERP system. Consider the environmental impact of your current system, such as energy consumption and hardware disposal.

STEP TWO: Define your goals and requirements. Clearly outline your objectives for the transition, such as improved performance, enhanced security, reduced IT maintenance costs, and minimized environmental impact. This will guide your decision-making process and ensure that the chosen cloud-hosted ERP solution aligns with your business needs and sustainability goals.

STEP THREE: Engage stakeholders. Involve key stakeholders from various departments, including finance, operations, IT, and sustainability, in the planning process. Their insights and buy-in will be crucial for a smooth transition and successful adoption of the new system while prioritizing environmental considerations.

STEP FOUR: Develop a comprehensive migration plan. Create a detailed plan that outlines the steps involved in the transition, including data migration, system integration, and user training. This plan should also include a timeline, resource allocation, and contingency measures to address potential challenges. Incorporate strategies to minimize data transfer and energy consumption during the migration process.

Sustainable ERP Migration: Vendor Selection and Deployment

If you’re hoping for a smooth migration, you should invent substantial time into researching and comparing cloud vendors. Not all cloud are created equal. Thoroughly investigate potential cloud-hosted ERP providers, considering factors such as industry experience, product features, scalability, customer support, and environmental sustainability practices. Look for vendors that use renewable energy sources, energy-efficient data centers, and responsible e-waste disposal methods. Request demos and references to make an informed decision.

Prioritize data security and compliance. Ensure that the selected vendor adheres to robust data security standards and complies with relevant industry regulations, such as GDPR or HIPAA. Inquire about their data encryption, backup, and disaster recovery practices. Consider the environmental impact of their data storage and processing practices.

Plan for successful data migration. Work closely with your chosen vendor to develop a data migration strategy that minimizes disruption to your operations and reduces data transfer energy consumption. This may involve data cleansing, formatting, and validation to ensure a seamless transfer from your on-premise system to the cloud-hosted ERP. Identify and eliminate redundant, obsolete, and trivial (ROT) data to minimize the amount of data migrated, thereby reducing energy usage.

Consider a phased implementation approach, starting with critical modules or departments and gradually expanding to other areas of your business. This incremental approach allows for better risk management, provides opportunities to refine processes along the way, and enables you to monitor and optimize energy consumption and environmental impact at each stage.

Change Management and Continuous Improvement After a Sustainable ERP Migration

PRIORITY ONE: Communication After Cloud ERP Migration

Keep your employees informed throughout the transition process, highlighting the benefits of the new cloud-hosted ERP system, including its positive environmental impact. Address any concerns they may have and emphasize the importance of sustainable practices. Clear and consistent communication will help foster a positive attitude towards the change and encourage eco-friendly behaviors.

PRIORITY TWO: Training in Cloud ERP

Invest in thorough training programs to ensure that your employees are comfortable and proficient with the new system. Include modules on sustainable data management practices, such as proper data categorization, retention policies, and responsible data sharing. Offer a mix of in-person, online, and self-paced learning options to cater to different learning styles and schedules while minimizing travel-related carbon emissions.

PRIORITY THREE: CLOUD ERP KPIs

Establish key performance indicators (KPIs) to track the success of your cloud-hosted ERP implementation, including metrics related to energy consumption, carbon footprint, and e-waste reduction. Regularly monitor these metrics to identify areas for improvement and ensure that the system is delivering the desired benefits while minimizing environmental impact.

PRIORITY FOUR: Sustainable ERP Migration Feedback

Foster a sustainable culture of continuous improvement for your users. Encourage your employees to provide feedback and suggestions for optimizing the use of the cloud-hosted ERP system and promoting sustainable practices. Continuously assess and refine your processes to maximize the value of your investment, drive ongoing operational excellence, and reduce your organization’s environmental footprint.

Are you ready to save your users and save the planet with a seamless on-premise or cloud-to-cloud ERP migration? 

The transition from on-premise to EstesGroup’s cloud-hosted ERP solution presents an opportunity for manufacturers and distributors to not only transform their operations but also contribute to a more sustainable future. By incorporating environmental considerations into the planning, vendor selection, implementation, and continuous improvement processes, businesses can minimize their carbon footprint while reaping the benefits of a cloud-hosted ERP system. With the right approach and a commitment to sustainability, manufacturers and distributors can navigate this shift successfully, driving efficiency, agility, and growth in an increasingly competitive and environmentally conscious landscape.

Streamline SYSPRO 8 Client Installs with Batch Install Files

Streamline SYSPRO 8 Client Installs with Batch Install Files

Simplifying SYSPRO 8 Client Installations

Installing client machines for SYSPRO ERP can be a tedious process. Accessing the SYSPRO 8 Installer on each client machine, signing in to the installer, going through the various tabs and steps to successfully install both the client and the necessary reporting software. What if there was a significantly easier way to perform these installations? As a matter of fact – there is!

SYSPRO ERP User

Instead of going through the installer every time you install a SYSPRO client, you can create and export a SYSPRO product batch file. The batch file allows you to both quickly and quietly install a SYSPRO client along with the necessary reporting software without using the SYSPRO installer at all.

You can create your own SYSPRO batch file installer by following the steps outlined below.

STEP ONE: Launching the SYSPRO Installer

Find and launch the latest version of the SYSPRO Installer. By default, this file is located in: “\\*servername*\SYSPRODeploy”.

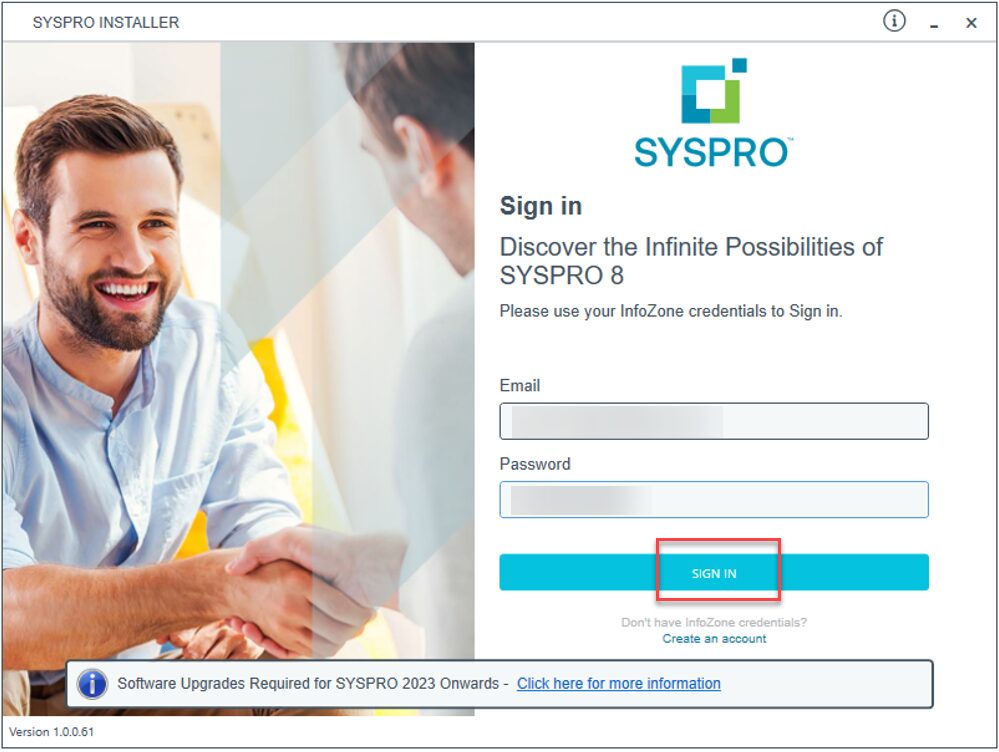
STEP TWO: Signing In

Go through the steps of signing in to the installer using your SYSPRO InfoZone credentials.

SYSPRO Sign In

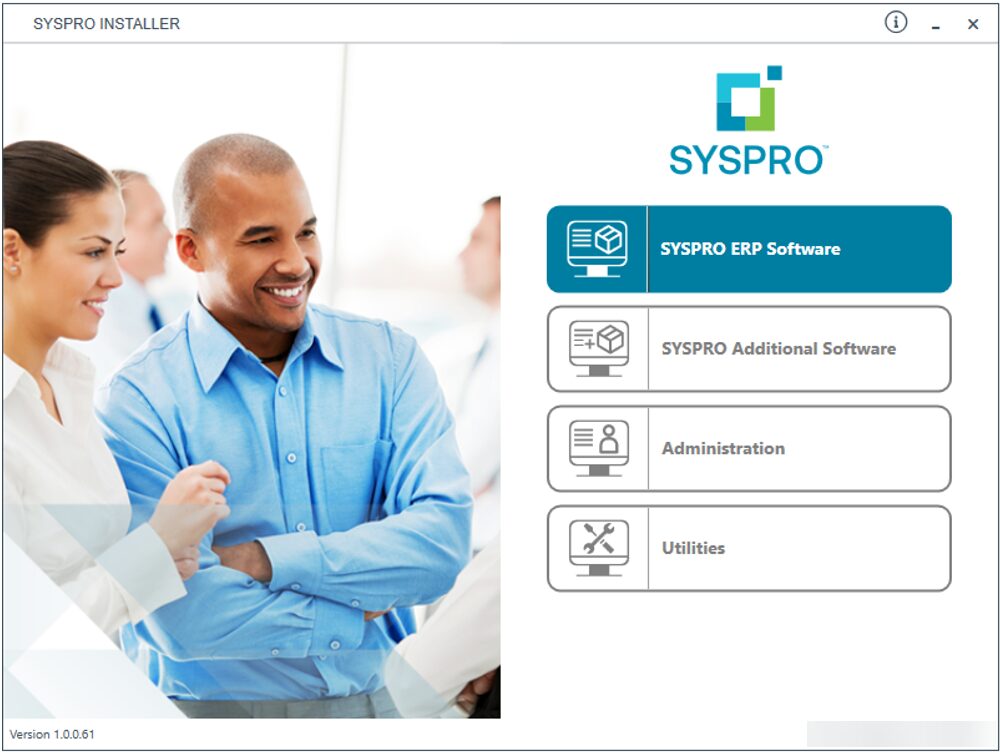
STEP THREE: Click to Select

Click on “SYSPRO ERP Software”.

SYSPRO Installer

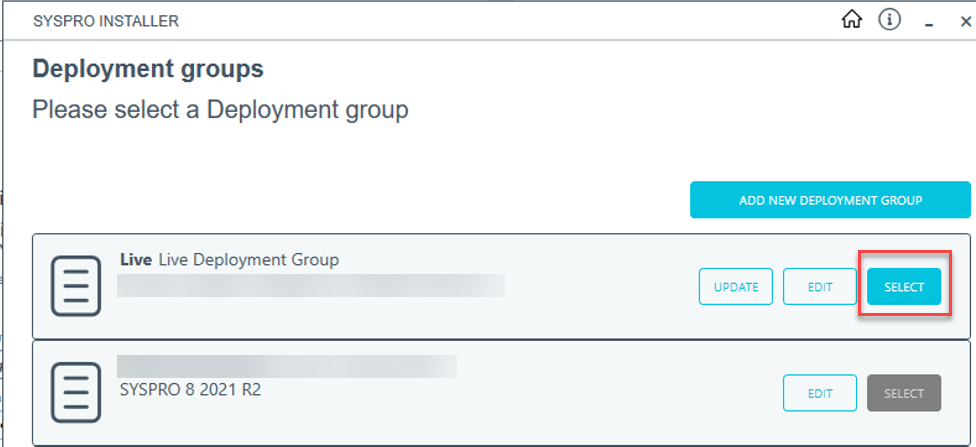
STEP FOUR: Selecting Deployment Group

Click “Select” on your desired deployment group.

SYSPRO Deployment Groups

STEP FIVE: Exporting SYSPRO 8 Client

You should now see the available product list for your SYSPRO environment. In the top left-corner of the product list header there will be a little “Export” button. Click this button.

SYSPRO Product Selection

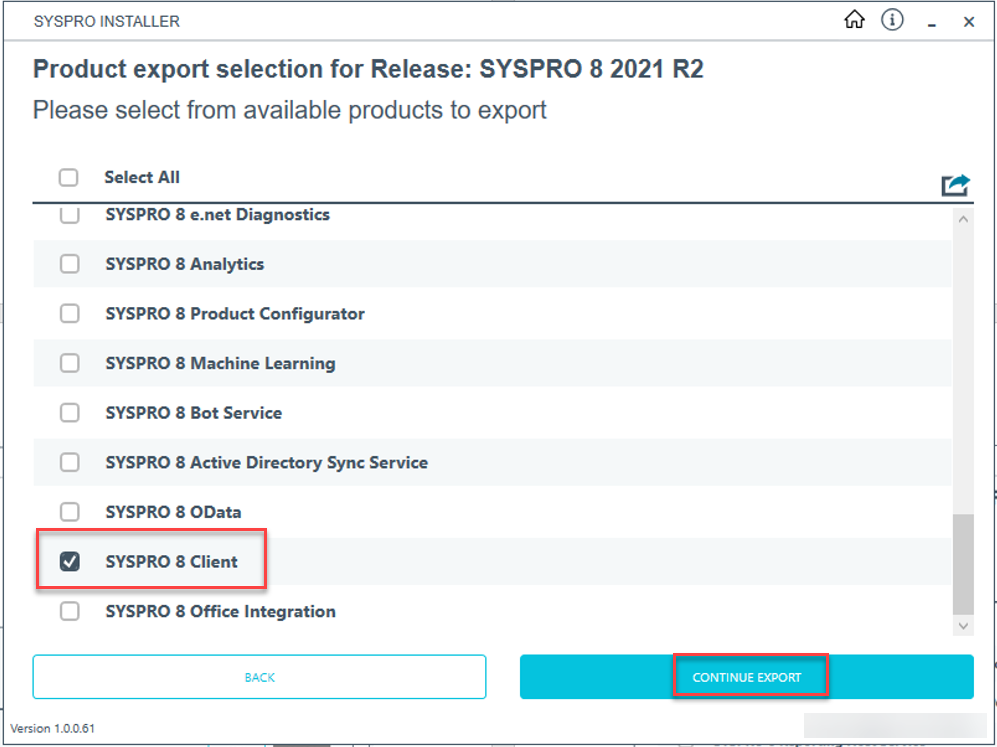
STEP SIX: Export

The product list now changes to an “Export” selection. Find and select the SYSPRO 8 Client and click to continue the export. 

SYSPRO Product Export

STEP SEVEN: SYSPRO Terms

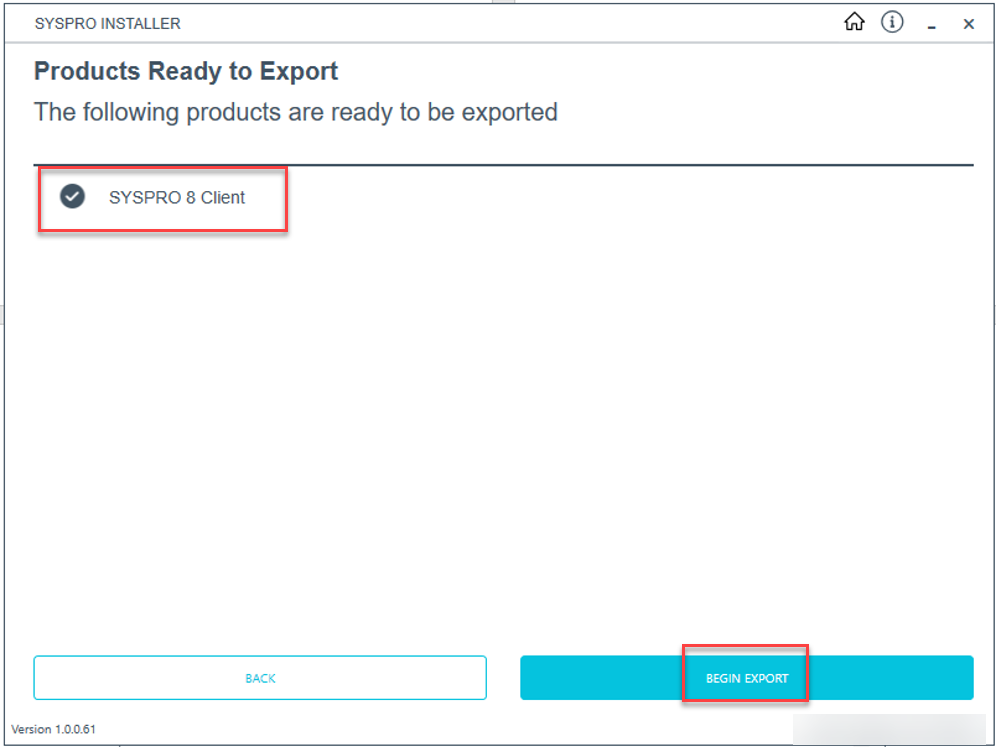
You will be asked to review and agree to general installation terms. Proceed through the export wizard until you can select to begin the export.

SYSPRO 8 Client

Effortless SYSPRO 8 Client Installation with Batch Files

A batch file is now created and can be used to install the SYSPRO 8 client along with its required services. By default, the batch file is stored in “\\*servername*\SYSPRODeploy\Exports”. Following similar steps, you can create an additional batch file for reporting software by navigating through the “Additional Software” section of the installer and selecting your version of Crystal Reports to export. Using these batch files, you can now quietly install a full SYSPRO client configuration with only a few clicks!

Here are a few helpful tips to keep in mind when using the batch files:

  • Run the batch file to install the SYSPRO client first prior to installing any reporting software. 
  • To ensure that the products are installed properly, make sure that you run the batch files as administrator. Additionally, the domain user running the batch files will need sufficient access to the SYSPRODeploy folder on the SYSPRO Server where the targeted products and install files are located. 
  • You can use the Programs & Features part of Windows to verify that the products installed successfully after running the batch files. 
  • If something fails to install, you can always use the SYSPRO 8 Installer program to retry the installation manually.

P21WWUG CONNECT 2024 and the Future of Prophet 21

P21WWUG CONNECT 2024 and the Future of Prophet 21

P21WWUG CONNECT 2024 Sponsor EstesGroup

EstesGroup is Proud to Sponsor the P21WWUG CONNECT Event in Chicago

As a proud Gold Sponsor of the Prophet 21 World Wide Users Group (P21WWUG) CONNECT event in Chicago, EstesGroup invites you to join us for this incredible opportunity to learn, network, and grow your business. This annual event is a must-attend for anyone using Prophet 21 software in the distribution industry. With expert-led sessions, user-driven classes, and valuable networking opportunities, CONNECT 2024 is the perfect place to gain new insights and connect with like-minded professionals.

Why You Should Attend CONNECT 2024

CONNECT 2024 features a lineup of expert speakers, including Epicor representatives, industry leaders, and experienced P21 users. Gain valuable knowledge and insights from those who have been in your shoes and have found success. Connect with other P21 users from around the world, share your experiences, and learn from one another. EstesGroup, as Gold Sponsor, will offer multiple networking opportunities, and the Prophet 21 World Wide User Group will bring your team even more opportunities to network with peers this year.

Discover New Solutions for Prophet 21 ERP

At P21WWUG CONNECT 2024, you can engage directly with vendors presenting a diverse array of complementary products and services aimed at enhancing operational efficiency and maximizing profitability. Discover the tools essential for moving your business forward, ensuring that you remain competitive and adaptable in an ever-evolving marketplace. Whether seeking streamlined operations or aiming for enhanced performance, this event provides the platform to explore solutions tailored to your specific needs, empowering you to elevate your business to new heights.

Get Answers to Your P21 Questions

Whether you’re seeking clarity on specific functionalities or aiming to optimize your usage of the platform, this opportunity offers a direct line to expertise. Engage with fellow users and experts alike, fostering an environment of collaboration and knowledge-sharing. Don’t miss this chance to delve into the depths of Prophet 21 and emerge with actionable strategies to improve operations. Stay up-to-date on the latest trends, best practices, and innovations in the distribution industry.

EstesGroup’s CONNECT 2024 Session: Overcoming Obstacles to Web UI Migration

As a leader in helping businesses transition to the Prophet 21 Web UI, EstesGroup will be presenting a session titled “Overcoming Obstacles to Web UI Migration.” Our team of experts will share valuable insights, best practices, and lessons learned from helping numerous clients make the switch from the legacy Desktop App to the Middleware/Web UI-based configuration. You will learn:

  • How to configure middleware servers for optimal Web UI performance
  • How to adapt to changes in printing and reporting with the Web UI
  • How to handle scheduled tasks and TCPX in the new environment
  • How to migrate custom functionality, including Dynachange screen mods, business rules, portals, reports, integrations, and more

Don’t miss this opportunity to learn from our experienced team and gain the knowledge you need to successfully migrate to the Prophet 21 Web UI.

As your trusted partner in Prophet 21 implementation, optimization, cloud deployment, and support, EstesGroup is committed to your success. We are excited to sponsor and participate in CONNECT 2024, and we look forward to connecting with you in Chicago. Visit our booth at the event to learn more about our services, including the following:

  • Prophet 21 implementation and upgrades
  • Web UI migration and optimization
  • Custom development and integrations
  • P21 training and support
  • Custom cloud solutions
  • Technology solutions and services managed by EstesGroup’s Prophet 21 experts

Our team of experienced consultants will be on hand to answer your questions, provide demos, and discuss how we can help you achieve your business goals with Epicor Prophet 21, third-party solutions, distribution industry trends, business excellence, and more!