Select Page
Troubleshooting SYSPRO: General SYSPRO 8 Instabilities

Troubleshooting SYSPRO: General SYSPRO 8 Instabilities

Is Troubleshooting SYSPRO Troubling You?

General issues are to be expected when utilizing a client-server-based piece of ERP software the size of SYSPRO. Client machines not responding, crashing, or getting disconnected is not unusual. From an administrative perspective, it is important to know the various factors that can affect these general system stability issues. In this article, we have outlined some of the factors that can cause these problems as well as some tools to know, utilize, and review when diagnosing general SYSPRO instability. 

Troubleshooting SYSPRO Warehouse Worker

Antivirus and Firewall Exceptions

One of the general offenders causing SYSPRO issues are antivirus software. SYSPRO opens the required ports in the Windows Firewall when it is installed, however, most sites utilize additional antivirus and/or firewall software that will have to be configured separately. SYSPRO 8 uses port 30250 and 3702 by default but be sure to verify the ports used in your own environment. 

If you see installation errors relating to SYSPRO clients or client-side reporting tools, you can try disabling local antivirus during the installation. Make sure to turn it back on after the installation has been completed. 

SQL Health Dashboard

The SQL Health Dashboard (IMPDBS) is a built-in SYSPRO tool that analyzes your SQL Server and reports back with any potential issues. When you open the program, it will scan your SYSPRO databases one by one and provide you with an overview of potential issues. Any issues reported here will likely relate to system-wide issues more so than issues pertaining to specific client machines. Seeing this program report “green” across the board is vital for ensuring that your SQL Server is running at its best. 

System-Audit Query

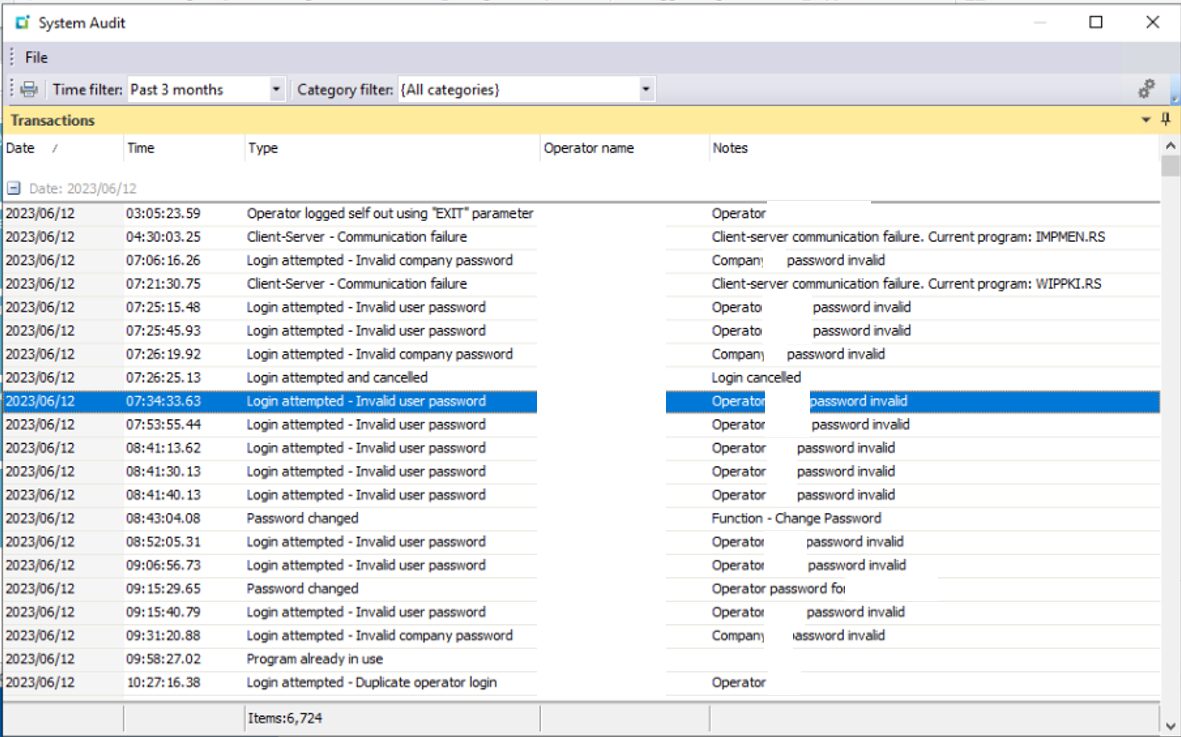
System-Audit Query (IMPJNS) is another built-in tool that you can use to diagnose problems in SYSPRO. This one is particularly helpful to determine if disconnects or errors are unique to a specific operator and/or program. You can use the program to filter for client-server disconnects and determine who is encountering them, when they are encountering them, and where they are encountering them. This program can’t fix the problem, but it can tell you if one exists!
Troubleshooting SYSPRO ERP

SYSPRO Troubleshooting: SYSPRO System Audit

Client Folder Permissions

By default, the client-side installation of SYSPRO is found at “C:\SYSPROClient”. This folder contains the local SYSPRO install, user settings, and program files. Depending on default settings for a domain user, it is possible that there is insufficient access to this folder. If a local client machine is having unusual errors or access problems, try providing full control for authenticated users to this folder. You can do so by right-clicking the “SYSPROClient” folders and going to “Properties”. 

Check Resource Utilization

SYSPRO utilizes significant system resources during certain business functions and report generation. To ensure that SYSPRO has sufficient resources to perform its tasks, be sure to review local client machine hardware and memory availability on the SYSPRO server itself. If the server is suffering from limited resources, it can result in a system-wide slowdown for all client-machines connected to SYSPRO.

Troubleshooting SYSPRO with EstesGroup Experts

Troubleshooting general SYSPRO 8 instabilities can be a complex and time-consuming process. From managing antivirus and firewall exceptions to monitoring SQL health and system resource utilization, there are numerous factors to consider when diagnosing and resolving these issues.

However, by leveraging the power of private cloud hosting through EstesGroup, you can simplify your SYSPRO deployment and minimize the risk of encountering these instabilities altogether. With our expertise in managing SYSPRO environments and our state-of-the-art private cloud infrastructure, you can focus on running your business while we handle the technical complexities.

SYSPRO ERP Utilities – Utilizing the Data Dictionary Viewer

SYSPRO ERP Utilities – Utilizing the Data Dictionary Viewer

SYSPRO’s Data Dictionary: Efficient ERP Database Management

Software systems such as Enterprise Resource Planning systems (ERPs) consolidate so much functionality into a single application. This means that the database structure they work with is equally as encompassing and can be overwhelming to familiarize yourself with. SYSPRO alone uses over 1000 database tables and knowing exactly where to look for certain can be a tough challenge. Thankfully, SYSPRO has a built-in tool called the “Data Dictionary Viewer” that can help put descriptive labels on otherwise complicated database elements. 

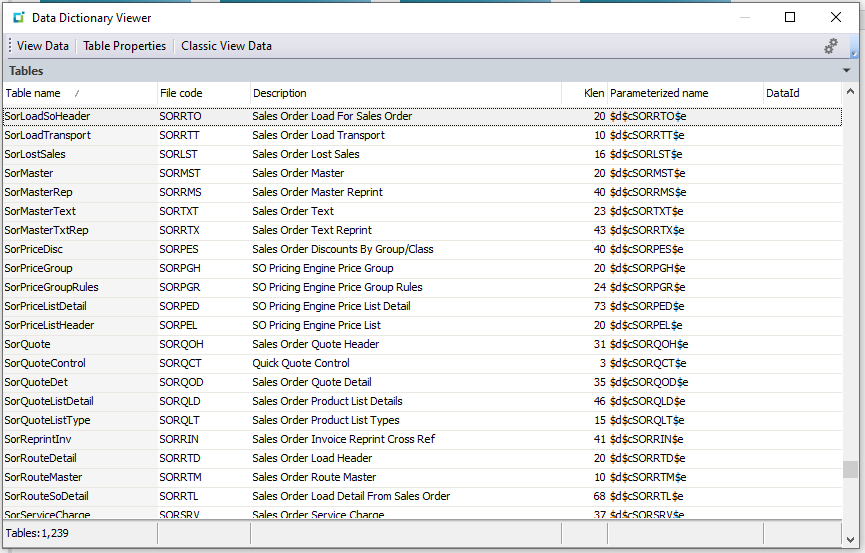
You can find the Data Dictionary Viewer program in SYSPRO’s program list by going to Utilities Data Dictionary Viewer.  The program will load a list of all tables in your SQL Server database. Along with the table names and file codes, it will include descriptions to highlight what the purpose of the table is. The list is long so to help you find the exact table you are looking for you can use CTRL + F to open a “Search” tab. You can then type in parts of what you are looking for and SYSPRO automatically filters the list. 

SYSPRO Data Dictionary

Data Dictionary Going Deeper

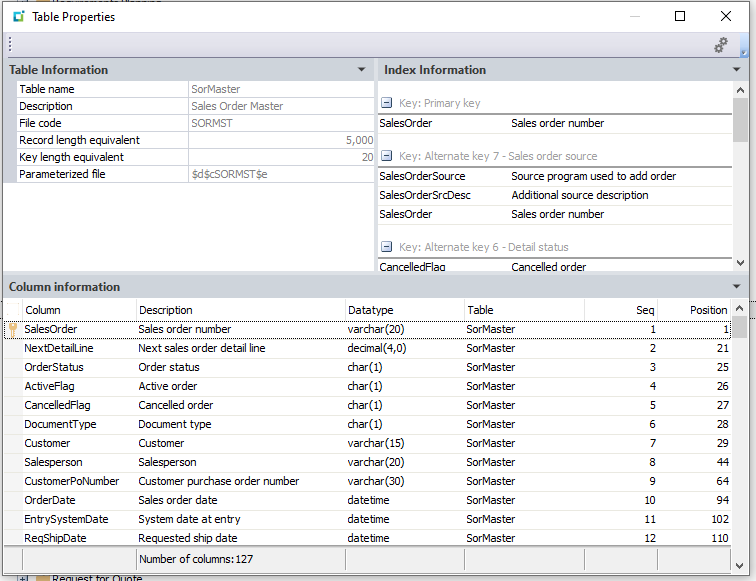
To go a level deeper, you can highlight a table record and click the “Table Properties” toolbar button. This will open a new window with details about the table, its columns, and key structure. The information found on this screen can be particularly helpful if you are creating custom reports but can’t figure out which exact field contains the data you are looking for. 

SYSPRO ERP Data Dictionary

Leveraging SQL Querying Tools in SYSPRO for Enhanced Data Management

While the program also contains a feature to display the data found in the database table, we recommend you instead use actual database tools. The built-in tool is no replacement for proper SQL querying tools. Many tables in SYSPRO can have a significant number of columns and not to mention millions of data records based on your business’ usage of SYSPRO. Using SQL to query and filter will make it much easier to navigate this data. 

What Does the SYSPRO Data Dictionary Viewer Do?

The Data Dictionary Viewer enables both SYSPRO experts and newcomers to quickly find and learn about the database tables that contain the data held within SYSPRO ERP. Next time you build a custom report or macro script, try using this tool and see how easy it can be to narrow down a massive database to exactly the few datapoints you need!


SYSPRO ERP Utilities, particularly the Data Dictionary Viewer, stand as indispensable aids in navigating the intricate landscape of database structures within the system. With over a thousand database tables to contend with, the challenge of pinpointing specific data elements can be daunting. However, the Data Dictionary Viewer offers a solution, providing descriptive labels and organizational tools to streamline the process.

By accessing this tool through SYSPRO’s program list and utilizing features such as table properties and search functionality, users can gain deeper insights into the database architecture, facilitating tasks like report generation and macro scripting. While the built-in feature for displaying data may suffice for some purposes, the recommendation to leverage dedicated SQL querying tools underscores the complexity and scale of SYSPRO’s database infrastructure.

How EstesGroup Helps Customers With SYSPRO

Ultimately, the Data Dictionary Viewer serves as a bridge between SYSPRO experts and newcomers, empowering them to efficiently harness the wealth of data housed within the ERP system for enhanced decision-making and operational efficiency. Embracing this tool can unlock new levels of productivity and precision in leveraging SYSPRO’s capabilities, ensuring that users can extract meaningful insights from the vast expanse of data at their disposal.

For businesses seeking comprehensive support in optimizing their SYSPRO ERP system and navigating its intricate functionalities, EstesGroup offers a wealth of expertise and tailored solutions. Our team of SYSPRO consultants brings extensive experience in database management, including proficient utilization of tools like the Data Dictionary Viewer to streamline operations and drive efficiency. 

Beyond database management, EstesGroup provides a wide array of IT services, encompassing cloud solutions, cybersecurity measures, system integrations, and more. Whether it’s implementing customized reports, fine-tuning database configurations, or migrating to cloud-based infrastructures, our consultants are equipped to address diverse needs and challenges. With a commitment to delivering holistic support and maximizing the value of SYSPRO ERP investments, EstesGroup stands ready to empower businesses on their digital transformation journey.

SIGN UP FOR A CLOUD DEMO TODAY

"*" indicates required fields

Name*
Email*

How to Reverse a Purchase Order Receipt in SYSPRO

How to Reverse a Purchase Order Receipt in SYSPRO

SYSPRO makes it easy to reverse a mistake.

Perhaps you entered a wrong price, received the wrong item, or maybe received one too many quantities of an item on your purchase order. It is easy to get familiar with the process of receiving items. However, what do you do when you make a mistake and need to reverse a SYSPRO PO receipt that was not quite right? As long as a received item has not yet been sold, adjusted, or transferred, then SYSPRO makes it easy to reverse a mistake. We will explain the process of reversing a PO receipt in this article.

Purchase Order Receipt SYSPRO ERP

For our test example, we have received a quantity of 5 for our stock code “A100” that we would like to reverse. To do so, we need to go to the Purchase Order Receipts program in SYSPRO. This program can be found in SYSPRO’s program list at Purchase Orders Purchase Order Processing Purchase Order Receipts.

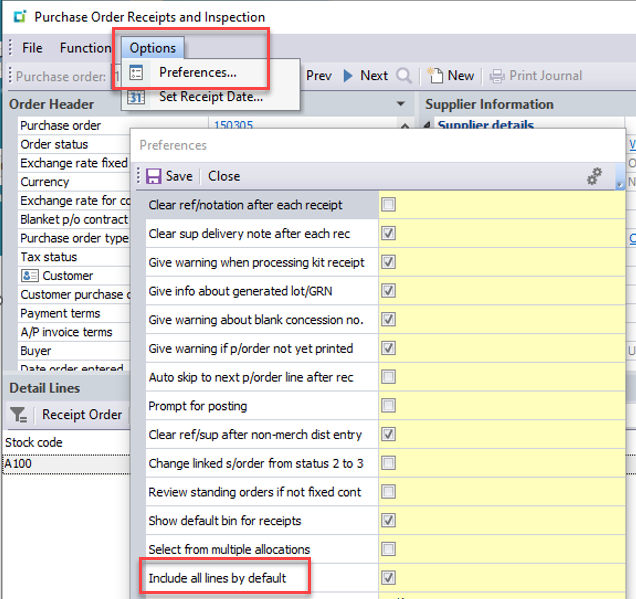
In the Purchase Order Receipts program, type in or browse to find the original purchase order number that your stock code was received on. If you received your PO line in full, you may notice that there are no lines showing on your PO to be received and you can’t find the original PO line for your stock code. This is because the program hides completed lines by default. To see your completed line, click on the “Options” tab at the top of the screen and select “Preferences…”. On the preferences screen, find and check the option that says, “Include all lines by default”. Click “Save” and the program will now show any completed lines on the selected purchase order.

Purchase Order SYSPRO ERP

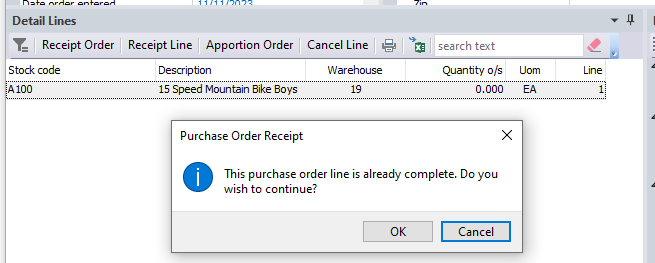
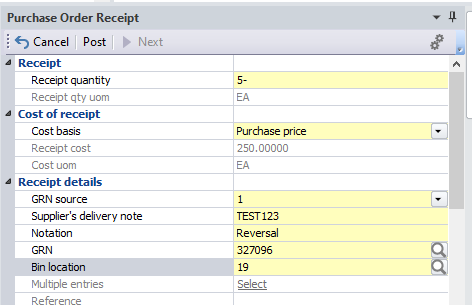
Now, find and select the purchase order line that you are wanting to reverse. Click the “Receipt Line” button or you can also double-click on the specific line to be reversed. If your line was completed by the original receipt, you will see a warning message. Click “OK”. 

SYSPRO Purchase Order Receipt

The “Purchase Order Receipt” pane will refresh with the details about the PO line. You will now have to do the following:

  • Enter a negative “Receipt quantity”. In our case, we want to reverse the full quantity of 5 so we enter a value of “-5”. 
  • Select the original cost basis. 
  • Enter any supplier’s delivery note if applicable.
  • Optionally, you can enter a notation to explain why the transaction is being reversed.
  • Enter the GRN number that was created when the item was originally received.

Click “Post” and the purchase order line receipt has now been reversed. You can verify the reversal by going to SYSPRO’s Inventory Query and check the “Movements” details for the stock code. 

Purchase Order SYSPRO

Adjusting preferences in SYSPRO ERP is easy.

Reversing a Purchase Order (PO) Receipt in SYSPRO ERP is a straightforward process that allows users to correct mistakes such as wrong prices, incorrect items received, or excess quantities. By accessing the Purchase Order Receipts program in SYSPRO, users can easily locate and select the original PO line to be reversed. Adjusting preferences to include all lines by default enables visibility of completed lines for reversal. Upon selecting the desired line, entering a negative receipt quantity, original cost basis, supplier’s delivery note if applicable, and a notation for explanation, if needed, facilitates the reversal process. Finally, posting the transaction confirms the reversal, which can be verified in SYSPRO’s Inventory Query. This systematic approach ensures accuracy and efficiency in managing PO receipts within the SYSPRO ERP system.

Are you seeking expert guidance and support for your SYSPRO ERP administration, implementation, and ongoing maintenance?

Look no further than EstesGroup consultants! Our team is dedicated to assisting you every step of the way, whether you’re setting up your system for the first time or looking to optimize its performance. With years of experience in SYSPRO ERP, we specialize in building, maintaining, and upgrading full-suite technology and cloud services tailored to your specific needs. From initial setup to continuous support and upgrades, we’re here to ensure your SYSPRO system runs smoothly and efficiently. Don’t hesitate to reach out to us today for personalized assistance and take your SYSPRO ERP experience to the next level!

EstesGroup is here to help with how to reverse a Purchase Order Receipt in SYSPRO ERP and more! Sign up for one of our newsletters to get IT and ERP tips sent to your inbox!

Change Management Tips for Your Epicor Kinetic Upgrade

Change Management Tips for Your Epicor Kinetic Upgrade

The Process

Is your team ready to unlock the full potential of Epicor Kinetic? Don’t fear the upgrade process – with these key strategies, you’ll guide your team through a smooth and successful transition. You can quickly elevate operations with Epicor Kinetic. But before you embark on this exciting journey, let’s address a common concern: Change Management.

Change Management Epicor Kinetic Upgrade ERP

What is change management in an Epicor Kinetic upgrade?

Change management for Epicor Kinetic is your strategic roadmap for a smooth transition from an older Epicor system to the new Kinetic platform. It involves proactively preparing, guiding, and supporting your entire organization throughout the process. The ultimate goal is to minimize disruption, ensure your employees embrace the new system, and maximize the benefits it has to offer.

How to Manage Your Change Management: Epicor Kinetic Upgrade Management

Successfully upgrading to Epicor Kinetic requires a collaborative effort. By implementing these key strategies, you can equip your team with the knowledge, ownership, and resources they need to thrive in the new system:

  • Keep employees informed about the upcoming changes, the reasons behind them, and the expected timeline is crucial.
  • Provide employees with the necessary training on the new features and functionalities of Kinetic ensures they can effectively utilize the system and its benefits. Actively involving key stakeholders and employees in the process can foster a sense of ownership and encourage participation.
  • Use your top talent at all levels to create a detailed plan that outlines the steps required to migrate data, update workflows, and adapt to the new system.

The Culture

Navigating an Epicor Kinetic upgrade requires a strategic approach. Discover how to minimize disruption, ensure user adoption, and maximize the benefits of your new system with effective change management strategies. Learn how to anticipate and address concerns, foster communication, and build a successful transition plan for your team:

  • Acknowledge and Address Concerns: Understand change can be daunting. Openly discuss potential challenges and proactively develop solutions to keep your team engaged and motivated.
  • Foster Communication and Transparency: Keep your team informed throughout the process. Share updates, address concerns, and encourage open communication to ensure everyone feels involved and heard.
  • Empower Your Team with Training: Equip your team with the knowledge and skills to navigate the new system effectively. Prioritize comprehensive training tailored to their specific roles and responsibilities.
  • Leverage Collaboration and Teamwork: Encourage knowledge sharing and collaboration between team members. Create a supportive environment where everyone can learn from each other and adapt together.
  • Celebrate Successes and Milestones: Recognize and acknowledge individual and team achievements throughout the transition process. Celebrate milestones to maintain positive momentum and reinforce the value of embracing change.

Prepare for your Epicor Kinetic upgrade with confidence.

Move quickly from your first decision to your building a team that can make the best decisions at every step:

  • Decide what you truly need from your ERP system. Collaborate to identify essential features and streamline your system.
  • Customize with purpose. Assess your current customizations, pinpoint those crucial to your workflow, and remove outdated ones.
  • Discover the power of Kinetic. Break down the new features and how they’ll benefit your specific operations.
  • Build a rock-solid upgrade plan. Develop a detailed strategy and assemble a dedicated upgrade team for a smooth transition.

Knowledge is power, especially when it comes to navigating complex upgrades.

A proactive approach fosters transparency and ownership within your team, paving the way for a smooth and successful transition to the new Kinetic system. By empowering your team with knowledge, you’ll be well-positioned to unlock the full potential of Kinetic and achieve your business goals. Here are a few tips:

  • Equip your team for success: Leverage EstesGroup’s expertise to provide your team with comprehensive documentation and resources.
  • Empower them as upgrade champions: Foster confidence by equipping your team with the knowledge to navigate each step of the process.
  • Gain clarity through collaboration: During an initial consultation, EstesGroup will guide your team through the entire journey, ensuring they feel fully prepared and informed.
  • Transparency and ownership pave the way: This proactive approach fosters transparency and empowers your team to take ownership, setting the stage for a smooth transition to Kinetic.

Anticipate to Migrate

During your Epicor Kinetic upgrade process, anticipate and address potential challenges and concerns your team might have. Understand that fear of change, unfamiliarity with the new system, and perceived disruptions to workflows are common sources of resistance. Partner with EstesGroup to ease the pain and get peace of mind knowing that your project will be successful, your ROI will be bountiful, and your team will be grateful for change.

How to Use Advanced Diagnostics in SYSPRO

How to Use Advanced Diagnostics in SYSPRO

Advanced SYSPRO Debugging Tools – The “Diagnostics” Setup Option

Outside of general SYSPRO database tables in SQL and eSignatures that are not enabled by default, it can be particularly difficult to investigate custom e.net transactions and SQL issues in SYSPRO. Thankfully, an advanced “Diagnostics” tool is available. Contrary to similar administrative tools such as the System Audit Query and Job Logging programs, this tool is not a standalone program. Instead, it is a settings-related options found inside your SYSPRO’s Setup Options program. 

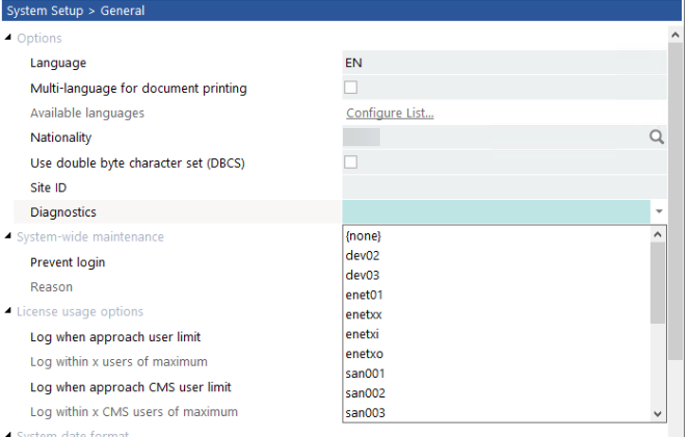
The setting in question is called “Diagnostics” and can be found within SYSPRO’s Setup Options program at: System Setup General Options Diagnostics. The field is a dropdown containing a variety of input options with not-so-descriptive naming conventions such as “dev02”, “enet01”, “enetxi”, and “srsd04”. While all the items available in the diagnostics list serve an important purpose, we will focus this article on the e.net-type diagnostics that can be used to help diagnose and potentially resolve complicated transaction issues. 

SYSPRO Diagnostics

SYSPRO E.net Options

When customizing SYSPRO particularly with third party programs or VBScripts, you are likely to encounter programmatic use of SYSPRO’s business objects. In extremely rare cases, you may experience issues running these business objects. Perhaps you don’t get an XML response, or you are encountering critical system errors with limited details about the errors. In this case, the “enet” diagnostic options can be useful. The “enet01” option creates a log of all business objects that have processed in the system since the diagnostic option was turned on. It saves important information such as transaction date/time, method names (logon, logoff, get, post), and status messages of each transaction. Consider the “enet01” option the “summary” of e.net type diagnostics.

If you require more detail about your e.net transactions, you can use the “enetxx” option. This diagnostics option saves the XML-In and XML-Out details of each business object transaction. The XML-In is the data that was passed to the business object. The XML-Out is the response provided back by the object. The “enetxi” option can be used to only monitor XML-In and the “enetxo” only monitors XML-Out.

While there are several other diagnostic types to choose from, it is unlikely that the information returned by these options will be of any help to you. The remaining diagnostic types are more commonly used by internal SYSPRO staff for testing and debugging of significant errors or new programs in SYSPRO. You can open SYSPRO’s “Help” documentation by pressing “F1” to learn more about the other diagnostics options if it should be of interest. 

System Impact and Log File Growth

It is important to know that some of these diagnostics options can result in very large log files if they are not turned off after an issue has been investigated. Particularly the “enetxx” option as the XML-In and XML-Out for every business object transaction can be significantly lengthy. If you are trying to monitor automated tasks and will have to leave these diagnostics on for extended periods of time, be sure to keep an eye on the log file sizes.

Additionally, many of these diagnostic types can slow down the overall system performance. Every post and query in SYSPRO use some type of business object. These transactions will see a slight performance hit due to SYSPRO recording and logging the data input/output. When you have completed investigating an issue, be sure to clear the log files and turn off the diagnostics options that you had enabled. 

The EstesWay to Advanced Diagnostics in SYSPRO

In conclusion, navigating through complex SYSPRO issues, especially those involving custom e.net transactions and SQL intricacies, can be daunting without the right tools and expertise. Fortunately, the “Diagnostics” setup option within SYSPRO’s Setup Options program provides a valuable resource for investigating and resolving such challenges. By utilizing specific diagnostic settings like “enet01” and “enetxx,” users can gain insights into business object transactions and detailed XML data, aiding in the troubleshooting process. However, it’s crucial to exercise caution with these diagnostic options, as they can lead to substantial log file growth and potential system performance impacts if left unchecked. Nevertheless, with the support and guidance of EstesGroup consultants, businesses can effectively leverage these advanced debugging tools to overcome SYSPRO-related hurdles and optimize their operations.

Empower your users with advanced diagnostics in SYSPRO ERP today.

SYSPRO Advanced Diagnostics Tool

Follow these steps to get immediate assistance with SYSPRO ERP:

  • Contact EstesGroup consultants via chat, website, or phone.
  • Describe your SYSPRO issue and request advanced diagnostic assistance.
  • Schedule a consultation with EstesGroup SYSPRO ERP specialists.
  • Collaborate with consultants to enable and utilize diagnostic tools.
  • Implement recommendations provided by EstesGroup for issue resolution.